Monday, June 29, 2009

Kids and Cameras

Well I did it again! I was watching my grandson playing baseball while attempting to shoot all the action with my camera. Pretty soon I found myself watching the game instead of shooting pictures of the action. My older grandson came along and asked if he could take a few shots. I said why not since I wasn't doing the job myself. The pictures he got were remarkable to say the least. He was lying on the ground in the grass shooing away. These are good shots from an unusual perspective, and when I looked at them I decided he needed a little more telephoto the next day. I pulled out one of my old D70's and equipped it with a Sigma 70-300 variable that he's used before. Here's a couple of his shots:

Both these are unedited and are presented as captured. They are also copyrighted so don't try to copy them.

The conversation that was going on behind me between the pitchers older brother and my grandson consisted of how well the pitcher was doing. That and the fact that the older brother had taught the brother on the mound how to throw various pitches. The dad said, "No, he ain't throwing none those, he's just throwing it." Will take a look at the second shot here and see if this boy wasn't thinking about what he was throwing.

Sunday, June 21, 2009

Shooting in the rain

Last winter I was asked to photograph a local parade. It was raining hard and I didn't have one of those rain hoods you could get at the camera store. It was a Veterans Day parade at Fort Vancouver in Vancouver, Washington. The person who asked me to do the shoot said if I got any good images they would "give me credit" for any images I let them have. That's another story so I won't spend a lot of time on it now. I didn't get credit and they didn't get any pictures. Anyway, I had to figure out a way to shoot the images I wanted and keep my camera and lens from being drenched. Click here if you would like to see my work from Fort Vancouver, Wa. http://DwainsPicks.imagekind.com/FortVancouver

One of the tips I picked up somewhere in the past covered this topic so I was prepared. The tip was to keep a few plastic bags in your camera bag. The ones from the rolls of bags in the vegetable department of your local grocery store are perfect. Next time you go shopping pick up a couple of them or clean and thoroughly dry the ones you use when you buy your veggies. The other thing you need is a good rubber band.

To use the bag, just put your camera inside so the lens with it's lens hood will be outside the bag opening. Use the rubber band to hold it in place by putting it around the lens and over the bag either on or just behind the lens hood. Use a large enough bag to allow you to extend your lens and make manual adjustments if necessary. You can then tear or cut another opening in the bottom of the bag to allow your hands access if you wish. This can be important if you are using a tripod. I also make one more hole for the viewfinder eyepiece. I make this as a tiny slit and then I stretch the plastic over the viewfinder flange. Then I put the rubber eyepiece cap on to hold the plastic in place. You need to be careful that you don't pull too hard on the plastic bag somehow causing the eyepiece cover to pop off and become lost.

I also keep a large clear garbage bag in my bag. I can use it to cover my camera and tripod in a hurry if a sudden wet spell pops up and I don't have time to put my smaller bags on. One other handy item is a small umbrella. I've seen these recently in camera catalogs and being advertised in magazines. and so on. I've been using one for a pile of years and didn't pay what they are asking. I use the ones from Wal-Mart that can be attached to a camp chair. I attach mine to my tripod in the same way. Mine is a tan color which is hard to find. Most of the ones they have now are blue or red. I use my umbrella more for shade than rain but it works in either case. Don't use it when it's windy though. It can cause camera shake and even act like a sail and tip your tripod over, camera and all.

You should also protect your cameras and lenses from dust and the plastic bag trick will work here too.

You should experiment with using the plastic bags in dry weather. Remember that the bag is going to be wet in wet weather and can transfer water to the camera on it's own of you're not careful. There are also other ways to put the bag on the camera that are effective. Shooting through the plastic can give you an artistic effect and you can also use the bag for an interesting framing effect. What ever you do with it, you should always keep one handy.

Friday, June 19, 2009

Old Photo Magazines

I had a pile of old photo magazines that I didn't want to get rid of. They contained "how-to" articles and other information that I just didn't want to part with. The problem was that the pile of magazines kept growing. When you live full time in an RV that is a real problem since space is so limited. I used to keep one of those tiny little three ring notebooks around for my photography notes. I would paraphrase my favorite articles and authors in the little notebook and keep it in my camera bag. That way if I needed to look up a subject for a scene that Iwas working on I had it with me. Pretty soon I needed two notebooks! You can see where this is going right? A problem with the little notebooks was that I couldn't keep the pictures associated with the articles, and their were so many that I wanted to keep. (fooled ya huh!) Well, space and weight have now become a problem there too.

My latest solution was to tear the articles out of the magazines that I wished to keep, then punch them for a full size three ring binder. This was great since I could keep several years worth of articles handy in a single binder. Well I'm now on my second binder of articles and once again space is becoming an issue.

I'm not sure what my next solution to information hording will be. Most likely I'll be scanning and storing the articles on one of those little flash drives. I think I'll experiment with storing it on camera cards for my camera in a format that I can view like when I'm reviewing images.

Wednesday, June 10, 2009

Give a kid a camera!

Need new inspiration? Give a kid a camera and see what you can learn from them.

These photos were created yesterday by my oldest Grandson, age 13, using an old D70 of mine. I put a Sigma 70-300 macro lens on it and showed him how it worked. The compositions are all his with no help from me.


The next two compositions are by the same photographer as in the previous blog. I gave him the choice of using my other D70 but he chose his own little point and shoot Olympus. A 2 megapixel hand-me-down that he likes.

Photography with my Grandson

My grandson came over to spend the night a couple of days ago. I took the opportunity to do a little photography with him. We took each others pictures and shots of other things too. At one point he told me that he wanted to take a picture of the tree we were near. I did not coach him on this or any of his other pictures. I always discuss them with him afterword though. Of the three pictures below, two of them are his. Only one of mine was good enough this time.

Photo's by my Grandson, age 10.


This image pretty much says it all for me.

Monday, June 8, 2009

Photography?


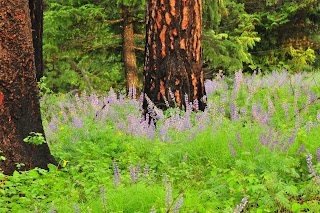
The Spring wildflowers are out in profusion now. I was able to capture a few good images yesterday morning as the sun was rising. It had rained hard overnight though and many of the smaller flowers had been pounded pretty hard and weren't looking very happy. They will come back but at the time I was there they didn't make good subjects.

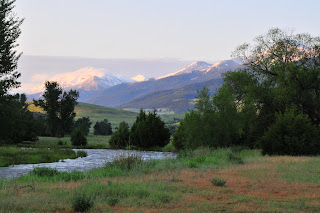
I caught myself making a common error during my shooting spree, and it's one that can be mostly attributed to having not been out shooting in awhile. Right at sunrise I had been shooting pictures of a mountain scene. I had a beautiful river with an "S" curve in the foreground, trees framing the right and left edges, and a beautiful view of high mountains with new snow on their peaks. 
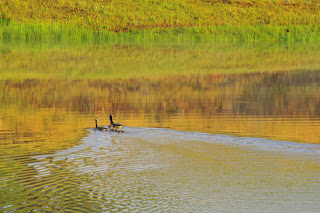
Ridge top winds were causing clouds at the tops of the peaks to flow off to the right, and the sun was just beginning to bath the mountainside with light. As I worked the shot with different views, frame compositions, and so on I needed to turn off my auto focus and do that manually for a little while. I soon lost my light and my inspiration for this scene and decided to move on. As I drove my truck to my new locations the sun continued to bath new scenes with morning light and captured pictures of barns, cattle, geese on a pond and so on. By the time I got to the geese on the pond, I noticed that I was having problems with focus again and tried to adjust the viewfinder focus dial thinking my eyes were the problem. Later on as I was traveling to where I wanted to shoot the wildflower scenes I stopped at another old barn that was swimming in light. I set up my tripod and prepared to shoot, but I discovered that at the closer range I was now, I couldn't focus the image. It was then that I realized that I had turned off the auto focus.

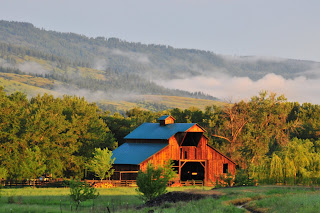
Fortunately the earlier scenes were at considerable distance. I had set the focus at near infinity and was using a small aperture for greater depth of field. So while my shots were not as clear as they could have been, they were not all that bad.

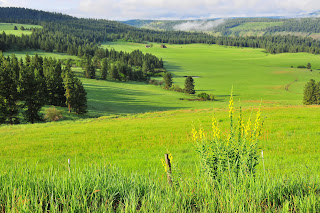
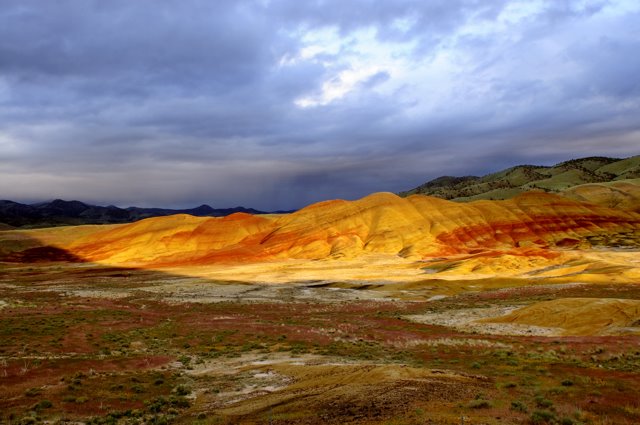
I captured images of lupines, balsamroot, paintbrush, grouse, wild turkey's,deer and another landscape scene that would take you back to another place and time, and make you wish you could have been there. What really made the experience memorable for me, was that I was simply there. The birds were singing their morning songs, the sun was rising in clear fresh air, and I was the only one there. I carry a small digital voice recorder in my camera bag and I took it out and recorded the sounds of the birds for a little while.

There is more to photography than shooting pictures!

DV

Friday, June 5, 2009

How to photograph a flower

I can't cover all the aspects of this topic in depth since there is so much variety in all the camera's people use and so on but I will discuss as much as is practicle.

This is the time of year for flower pictures. You see images of roses with dew drops on them, and all kinds of other blooms in gardens and yards everywhere. But how do you get your own images to look like the ones in the magazines?

To do this you need to understand (among other things) depth of field. Not all cameras will let you have control over this, but you need to know how it works anyway. Depth of field is controlled by the aperture of your lens and the distance to your subject. Aperture is the size of the opening that lets light into your camera. It is a mathematical ratio of the area of the opening. You don't need to worry about that, I only mentioned it so you would know. Aperture is expressed in terms called "stops" like "f/8," or "f/22" and so on. Now here's the important part and don't try to figure out why this works, just take my word for it OK! With all cameras and lenses, the bigger the opening in the lens, the shallower the depth of field, and the reverse is true as well. So the smaller the opening, the longer or deeper the depth of field. Here's a little twist about this, the smaller f-stop numbers refer to larger openings. The larger the f-stop number the smaller the opening. As I said don't try to figure it out, just take my word for it.

Now I said there is a lot to know about this so I'm going to add one more tid bit here for you to consider too. That is that the depth of field is also affected by the distance to the subject. If you set your cameras exposure and lock it in place then focus on something close you will have a shallower or shorter depth of field than if you focus on something farther away.

Okay, so how does all of this relate to shooting a flower? Well, in most instances you want as much of the flower in focus as possible. To do that you need an adequate depth of field. For those with SLR cameras you can set your aperture to it's highest setting such as f/28 or whatever and fire away. If you don't have control over aperture though you need to control the distance you are from the subject. Remember, the closer you are the shallower the depth of field. I have a little rule of thumb for new SLR owners that seems to help them understand how to use the F stops but it doesn't really explain what it is. Generally speaking, the higher the number, IE f/32 or f/64 the deeper the depth of field. Go to a smaller number such as f/2 and you have a shorter depth of field.

There are two other points I need to mention here. The first is composition and the second is where do you focus? With composition, you should always try to fill your frame. Closer and larger us usually always better when shooting flowers. When focusing, if you have control over this, you should always begin by focusing on the part of the flower that is closest to the camera. Experiment with other parts of the flower as well but start there first.

DV

Thursday, June 4, 2009

What is a Monopod?

A monopod is a one legged camera support that is designed to be used when you will be moving your shooting position often or you have very little space to set up in. This can be when you are in a crowd such as at a parade, or like you see at sporting events when a bunch of photographers are forced together in a small space. As with tripods, monopods come in all levels of quality and features.

When using a monopod, you become the missing parts of a tripod yourself. It should be longer than you are tall and should not be simply stood with the leg perpendicular to the ground. Instead it should extend out in front of you as a tripod leg would. You need to lean in to it a little and stand with your feet apart in a comfortable but sturdy position.

Some features to consider when buying a monopod include, but are not limited to, it's length, weight, and how easily and quickly it can be extended. Another important feature is whether you screw it to the tripod hole directly or that it has a head with a quick release base such as tripods use. This is really the best way to go and you can get monopods that use the same bases as tripods to if you look for them.

Of course monopods have their place in the photographers tool kit like everything else, and they have their avid fans too. Personally I prefer to always have my one of my tripods with me. If I want to use it as a monopod I simply extend only one leg. That way I still have my tripod available for those times when a monopod can't do the job.

Photography Tips

Here are a few things you can do to improve your photography that will apply regardless of what camera you use. These are the basics that every photographer should know and do to get reasonably good pictures out of any camera.

Make sure you have a clean lens. Don't just blow the dust off, but use a clean cloth suitable for cleaning lenses and do it right.

Set up so your camera is stable and won't move as you press the shutter. You can do this a number of ways. If you will be handholding the camera, hold your elbows in against your sides, and stand with your feet apart with one slightly forward of the other. You can also lean against a solid object like a light pole, tree, building or whatever. The best method though is to use a tripod or monopod. I have both but I like to carry the tripod best. If I want to use it as a monopod I just extend only one leg and us it as I would a monopod. I'll add instructions about to how to use these tools later.

Finally the "First" basic thing you need to do is read your manual and learn what all the parts of your camera are for and how to use them. If you understand how your meter works and what white balence is you'll go a long way to getting that shot you want when the light is wierd and you are wondering why your pictures are all dark or yellow instead of like what you saw on the monitor or in the viewfinder.

I'll expand on all these topics in the coming weeks and months so you'll want to check back and see what I've added from time to time.